Boo! Welcome back! I hope you are ready for some Halloween fun because today’s blog involves a DIY mummy pillow project!
Have you ever purchased a collection from Anita Goodesign and wondered whether you could use a particular motif for something else? Well, the answer is probably yes! For this DIY project, I chose to pull in one of Anita’s top Halloween collections, Trick or Treat Bags. This collection comes with 12 different Halloween-themed designs, with each motif available in two different sizes!
In the past, you may have purchased this collection, made a few bags, and let it fall behind. Well, I’m here to tell you it’s time to pull the collection back out because we are making something new and exciting!
Of course, when new collections hit the site, our first thought often relates to what our next quilt will look like, how we will make the project, or what we would love to place our embroidery designs on next! However, it’s time to think outside of the box! By skipping just a few simple steps, you have a new project at your fingertips.
When looking through our Halloween collections, I thought it would be fun to create a new project, out of a project-based collection. Who would have thought to place the front of a bag on a pillow? This is where the mummy pillow idea originated! Skipping machine steps within a design is much easier than one may think.
To shop the original Trick-or-Treat Mummy Bags clickHERE!
Guess what! The best part about today’s blog is that we provided a step-by-step tutorial on our YouTube channel to follow along! You can find this video byclicking hereor viewing below.
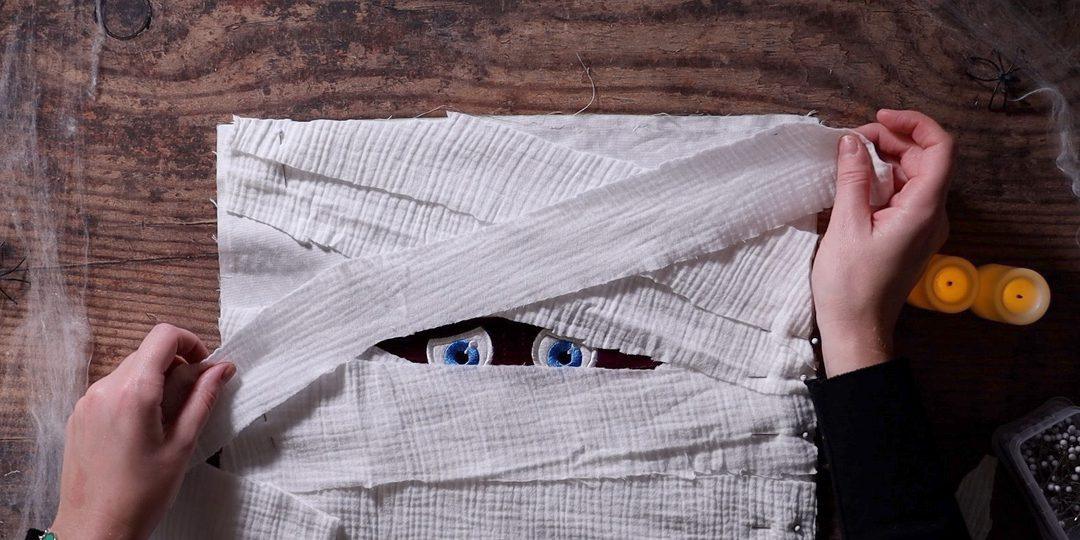
Now let’s get started! For this project, I started with step number 2. This was the placement stitch for the skin appliqué. Once I ran step three, which was my tacking stitch for the skin appliqué, I then skipped to step number 6, which was the placement stitch for the eyes.
Since I only wanted the face portion of this design, I then continued with my numbered machine steps and stopped once I finished step 12, which was the satin stitch for the skin appliqué. Then it’s time to add your textured fabric to portray the look of a real mummy!
I hope you enjoyed today’s Halloween spooky DIY Mummy Pillow tutorial! You can look forward to more fun projects in the future as we inch closer to more festive, fun projects! If you decide to test out your own version of this project, snap a photo and tag us onInstagramandFacebook!
ANITA GOODESIGN
Embroidery Software
Understanding your tools — so you can create with confidence
The software you use to digitize is only a small part in the equation to create a design. If you know how to sew, you can sew on any sewing machine. Likewise, if you can drive, you can drive any car. I find that digitizing software is the same — once you learn how to digitize, you will be able to use any software.
With that being said, some software is easier to use than others. There is a lot of digitizing software available these days, whether it is offered by a machine company, retailer, or as a download. When I started digitizing, there were only 2 companies that produced it and they were both very expensive. Now, you can purchase commercial-quality software for $2,000.00 or less. Each brand of software has unique features and is slightly different, but they all have similar features.
I have always said that they are all the same type of cake, but with different icing and decorations. One brand may have more decorative stitches, and another may have more automatic features. Usually the higher the price, the easier it is to use and the more features it will have. I always look for things like quality control features, being able to easily manipulate thread settings, and the ability to easily edit a design. You will be able to create the designs in this class using basic digitizing software. If you are in the market for a new brand of software, after this class you will know the right questions to ask.
3 Types of Embroidery Software
1
Viewing Software
This type of software allows you to view designs, send them to your machine, and catalog them. These are the most basic of all software and are very low priced — sometimes even free. A great starting point if you just want to organize and preview your design library.
2
Editing Software
Editing software allows you to edit designs that were digitized by someone else. It will also let you combine designs, add lettering, and alter designs — basically everything except digitize them from scratch. Perfect if you love customizing existing designs!
3
Digitizing Software
Digitizing software allows you to create designs from scratch. There are a lot of different features available and there are usually multiple price points from many different software manufacturers. This is the most powerful category — once you know how to digitize, you can bring any idea to life.
💡 PRO TIP
Not sure which type of software you have? Check your program’s feature list. If it lets you open a blank canvas and draw stitch paths from scratch, you’re working with digitizing software. If it only lets you open and adjust existing files, it’s editing software. Either way, knowing your tool helps you use it to its fullest potential!
Now You Know Your Software!
Whether you’re viewing, editing, or creating from scratch — the right knowledge makes every stitch count.
Embroidery Software | Anita’s Studio Series | Anita Goodesign
We've totally revamped the Double Sided Charm Tutorial—and honestly, it's a game-changer. The new version strips away the fluff and gives you exactly what you need to create stunning charms without all the head-scratching. Cleaner steps, sharper directions, zero confusion. Download the updated PDF and get creating!
Download the PDF by clicking here
ANITA GOODESIGN | Anita's Tutorials
Choosing the Right Embroidery Machine for Your Studio
Understanding machines, features, and what matters most for your embroidery journey
So you're ready to invest in an embroidery machine. The question isn't whether embroidery machines are worth it — it's which one is right for you. There are three main categories of machines, each with distinct strengths, and after 30 years in the embroidery business, I've stitched designs on dozens of different models. Let me help you navigate the options.
The Three Main Machine Types
Embroidery machines fall into three distinct categories, and understanding the differences is key to making the right choice for your studio.
1. Single Needle Home Machines
These are the workhorse machines for many embroiderers. They handle both embroidery and sewing, making them incredibly versatile for anyone who likes to piece together quilt blocks on the same machine they use for embroidery.
2. Multi-Needle Home Machines
With multiple needles (typically 6 to 10), these machines stitch faster because you don't have to rethread between color changes. They can handle tubular garments and baseball caps, opening up more creative possibilities.
3. Industrial Machines
These are the powerhouses — bigger, stronger, and built for production. They can handle large hoops (up to 21"x40"), difficult materials like varsity jackets, and feature multiple needles (up to 18). They're for serious production work.
Feature Comparison Chart
Here's a quick reference comparing the key features across all three machine types:
Feature
Single Needle
Multi-Needle
Industrial
Embroidery
Yes
Yes
Yes
Sewing
Yes
No
No
Tubular Garments
No
Yes
Yes
Baseball Caps
No
Yes
Yes
Max Hoop Size
12\"x18\"
11\"x18\"
21\"x40\"
Speed
Slowest
Medium
Fastest
Price Range
$1k–$20k
$1k–$20k
$7k–$15k+
Going Deeper: Key Considerations
Does the Machine Quality Really Vary?
Here's the honest truth: after 30 years of embroidery, if you stitched the exact same design on 20 different machines and showed them to me without telling me which was which, I couldn't tell you which machine made which stitch. The stitch quality is remarkably consistent across all three machine types. So don't choose based on the assumption that one produces better stitches than another — they don't.
What Actually Matters: Speed, Capacity, and Features
The real differences come down to four things: speed, hoop size, built-in features, and the ability to handle difficult materials.
Understanding Speed: It's More Than Stitches Per Minute
When a manufacturer says a machine runs at 1,200 stitches per minute, many people assume that means 6,000 stitches will stitch in exactly 5 minutes. That's not how it works. That rating assumes very small stitches with no thread breaks. Real-world factors that slow things down:
• Longer stitches require the machine to slow down for the throw distance
• Thread trims and color changes add significant time
• The more complex your design, the longer it takes
• With all factors equal, industrial machines are the clear speed winners
Handling Difficult Materials with Ease
Want to embroider a varsity jacket or thick denim without it bunching or falling out of the hoop? Industrial machines win this category hands down. Their size and strength let you stitch on heavier, more complex materials with ease. Home machines have limitations here.
Service & Support Matters (Especially for Industrial)
Home machines can typically be serviced at your local sewing dealer — quick and convenient. Industrial machines require scheduling a technician to come to you, often for two visits (one to diagnose, one to fix). If you don't live near a technician, repair costs can balloon quickly. This is a huge factor if you're considering going industrial.
💡 PRO TIP
One machine is rarely enough. Many of us in the embroidery world own multiple machines — each serving a different purpose. You might have a home machine for everyday work and design editing, and an industrial machine for production-heavy jobs.
Making Your Choice
Choosing the right embroidery machine is a personal decision that depends entirely on your needs. Ask yourself:
• Do I want to sew and embroider on the same machine?
• Am I doing hobby work or production?
• How much space can I dedicate to the machine?
• Do I need to embroider on difficult materials?
• How important is speed to my workflow?
There's no single right answer — only the answer that's right for your embroidery journey. Consider what you'll be making, how much time you have, and your budget. And remember: whatever machine you choose, the most important ingredient is you and your creativity.
Happy stitching!