Hi everyone! It’s a new week, which means it’s time for another blog! I hope you all are having a fantastic day/week! As promised, I will be bringing you all the puppy love for today’s blog. I wanted to create something fun and inspiring for those of you who have animals yourself, or know of someone who love this project as a gift!
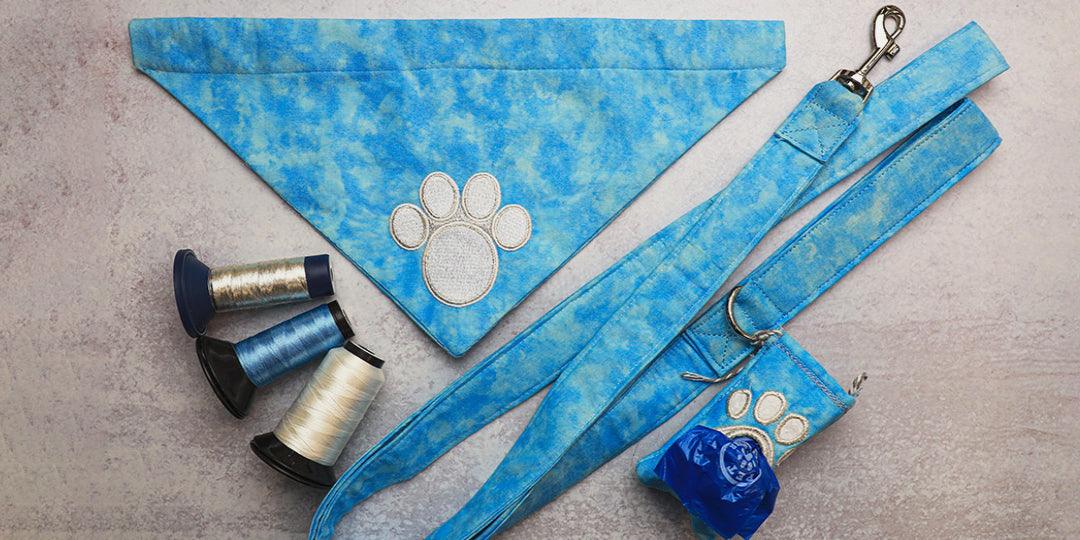
Today, we will be creating the ultimate pet package! I have pulled two collections from our embroidery library; Pet Bandanas (November 2014) and Pet Bag Dispensers (August 2020). As a bonus, I will be providing you with a free tutorial on how to make a matching leash from scratch, to go with this amazing combo!
Now let’s dive into it! First, you will need to select your designs from the collections mentioned above. For this project, I used the same cotton fabric for both the bandana and the bag dispenser. I wanted everything to look as if I purchased it as it set.If you would like to mix and match your colors, you are more than welcome to! Once you have your designs selected, go ahead and run your files! Once you have those complete, let’s make our leash!
MATERIALS LIST
- 6ft x 4.5″ Fabric Strip
- 6ft x 1″ of Cord
- Metal Ring
- Metal Leash Clip
- Coordinating Thread
- Needle
- Sewing Machine
- Bobbin
- Steam Iron & Ironing Board

STEP 1
To begin, start by cutting out a fabric strip using the dimensions 6ft x 4.5″.

STEP 2
Using a steam iron, fold your fabric in half with wrong sides together and steam press.
STEP 3
Open your fabric strip. You will now notice there is a seam down the middle. Our next goal is to create four panels. Using a steam iron, fold your fabric so it aligns to the center seam we just created and steam iron in place. Next, fold the ends of your fabric strip inward at 1/2″ and press.
STEP 4
Tuck your cord in one half of your folded fabric strip, as shown.
STEP 5
Now, fold your fabric in half and pin in place. The four panel folds are designed to help your lash become sturdier.
STEP 6
Topstitch down each side of your leash using a 1/4″ seam allowance.
STEP 7
Choose one end of your leash for the handle. Starting at the end chosen for your handle, mark in 12″ and pin in place.NOTE: If you would like to add a metal D ring for your Pet Bag Dispensers, slip it onto your handle before you pin it in place.
Using a 1/4″ seam allowance, I stitched a 1″ square around the bottom of my handle. Starting at the corner of your square, stitch diagonally towards each corner to create an X shape!

STEP 8
Now, it is time to add our metal leash hook! You can purchase this online, or if you are revamping an old leash like I did, you can use your hook from a previous leash! Using the other end of your leash, slide your hook 2″ in.
STEP 9
Pin your leash in place and stitch! I wanted to create the same design I stitched for the handle. This is designer’s choice, so as always, you can decide if you would like a straight line, or to make yours just like mine!
STEP 10
There you have it! Now you have a complete matching set, which includes a leash, bandana, and bag dispenser! 
I hope you all enjoyed this fun tutorial! Don’t forget to check out what other fun pet collections we have on our website! Stay tuned for more fun blogs coming in the near future! We post one blog every Friday at 9am. Also, don’t forget, you can email me with suggestions at blog@anita-goodesign.com.
As always, thank you for joining me! I hope you enjoy pictures of my fur-ever friends and special companions showing off our Pet Package project!
Happy Sewing!
Brooke