
|
ANITA GOODESIGN | Anita's Tutorials Three-Dimensional Flower Build a freestanding appliqué flower — one layer at a time |
|
SKILL LEVEL Intermediate |
HOOPINGS Multiple Hoopings |
TECHNIQUE 3D Appliqué |
|
Three-dimensional designs are a wonderful way to make a project leap off the fabric. Because the flower stands on its own, the design is worked in two or more hoopings: the dimensional pieces are stitched first, then layered and tacked onto a base in a final hooping. The freestanding petals are stitched onto wash-away or tear-away stabilizer so they can be released cleanly once finished. When the pieces are assembled, you are left with a soft, layered flower that adds real texture and depth to garments, quilts, and home décor. |
|
MATERIALS LIST |
|
◆ Wash-Away stabilizer (1st hooping) |
|
◆ Tear-Away stabilizer (2nd hooping) |
|
◆ Appliqué fabrics |
|
◆ Embroidery threads |
|
◆ Coordinating bobbin thread |
|
◆ Curved-tip embroidery scissors |
|
◆ Ruler |
|
◆ Rotary cutter and mat |
|
◆ Pins (optional) |
|
◆ Embroidery tape |
|
◆ Embroidery hoop |
|
◆ 75/11 embroidery needle |
|
Step 1 |
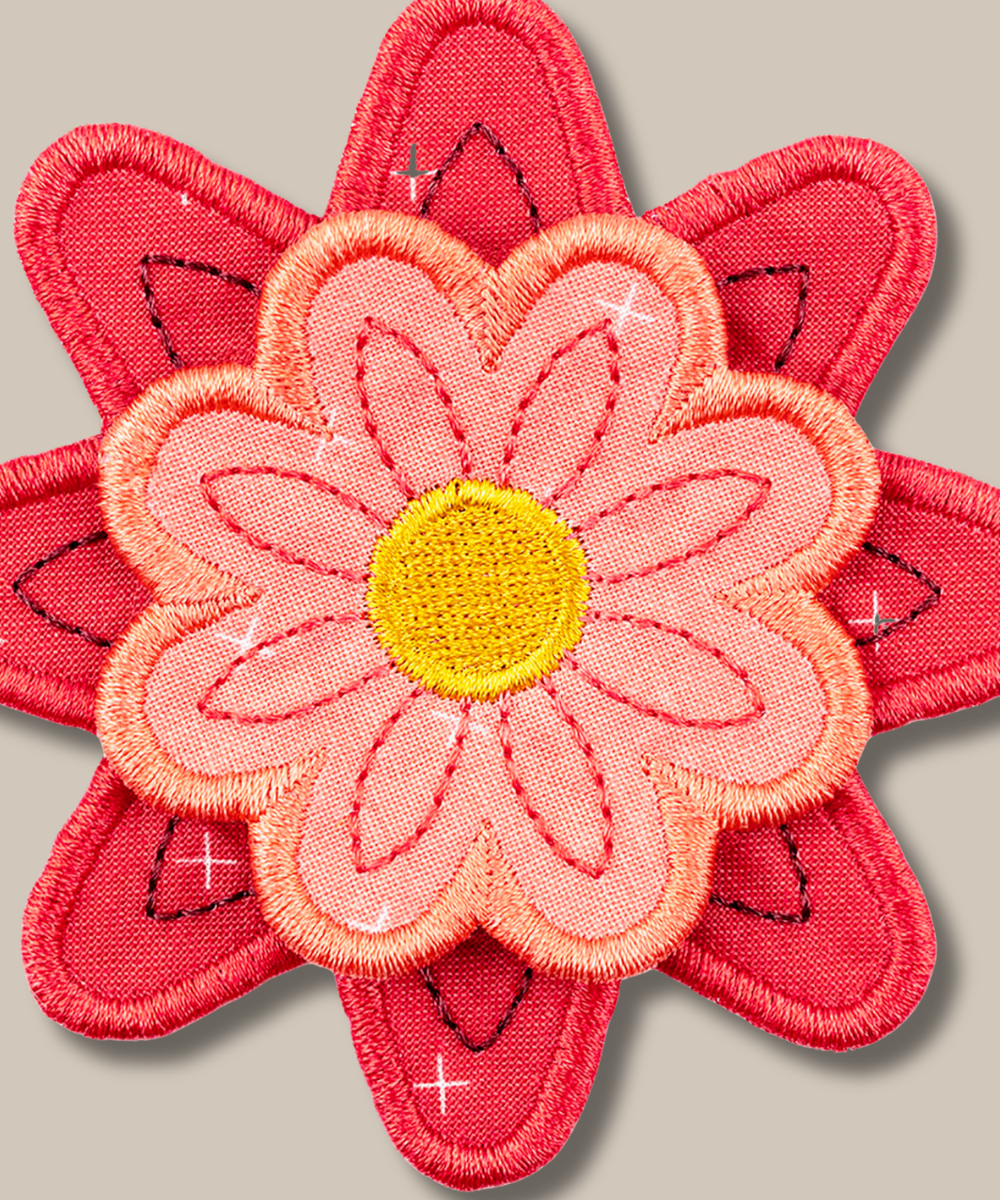
Meet Your Finished Flower Here is the dimensional flower you will be making. Take a moment to see how the layered petals stack to create the raised, three-dimensional look before you begin. |
|
|
|

|
Step 2 |
The Two Flower Pieces Your flower is built from two separate appliqué pieces — a larger lower flower and a smaller upper flower. You will stitch both as freestanding elements first, then combine them in the final hooping. |
|
|
|

|
Step 3 |
A Look at the Center Detail The very last stitch fills the flower’s center with a dense satin texture like this. Keep this finished detail in mind — it is the step that ties the whole flower together at the end. |
|
|
|

|
Step 4 |
Hoop Your Wash-Away Stabilizer Begin the first hooping by hooping a piece of wash-away stabilizer, pulled drum-tight. Load design AFC3DFlower1 to create the petals. A firm, wrinkle-free hooping keeps every stitch in register. |
|
|
|

|
Step 5 |
Run the Placement Stitch Run the first machine step — the placement stitch. This light outline shows you exactly where to lay your appliqué fabric in the next step. |
|
|
|

|
Step 6 |
Position Your Appliqué Fabric Lay your appliqué fabric right side up directly over the placement stitch. Start at one corner and smooth it down so the outline is fully covered on every side. |
|
|
|

|
Step 7 |
Cover the Outline Completely Make sure the fabric extends past the placement outline all the way around. Any gaps will show once the design is tacked, so give yourself a little extra on each edge. |
|
|
|

|
Step 8 |
Tack and Trim the Excess Fabric Run the next machine step — the tacking stitch — to secure the fabric. Then, with curved-tip scissors, carefully trim away the extra fabric close to the tacking line, taking care not to cut through the stitches. |
|
|
|

|
Step 9 |
Check Your Progress After trimming, your design should look like a clean flower shape. Neat trimming here gives you crisp, professional edges in the finished piece. |
|
|
|

|
Step 10 |
Run the Decorative Stitch Run the next machine step, a decorative embroidery stitch that adds detail across the petals. Watch the flower start to take on its finished character. |
|
|
|

|
Step 11 |
Add the Back Fabric Remove the hoop from the machine and flip it over to the back. Lay your backing fabric right side up so it fully covers the back of the design, then hold it in place with embroidery tape. |
|
|
|

|
Step 12 |
Tack the Back Fabric Return the hoop to the machine and run the next step — the tacking stitch that locks the backing fabric to the design from behind. |
|
|
|

|
Step 13 |
Stitch the Satin Edge Wind a bobbin in a color that matches your top thread and load it. Then run the satin-stitch step that wraps the flower’s edges in a smooth, finished border. Your design should look like this. |
|
|
|

|
Step 14 |
Flip and Trim the Backing Take the hoop off again and flip to the back. Trim the excess backing fabric close to the tacking stitch with your curved-tip scissors, being careful not to clip the stitches. |
|
|
|

|
Step 15 |
Begin the Second Flower Using the same sequence you just followed, start stitching the smaller secondary flower. Place, tack, trim, and stitch it exactly as you did the first piece. |
|
|
|

|
Step 16 |
Build Up the Second Flower Continue through the remaining steps for the secondary flower until both pieces are complete. You will now have a larger flower and a smaller one ready to combine. |
|
|
|

|
Step 17 |
Finish the Smaller Petal Set The smallest petal layer is stitched the same way on its own area of the stabilizer. Once it is done, all of your freestanding flower pieces are finished stitching. |
|
|
|

|
Step 18 |
Rinse Away the Stabilizer Remove the pieces from the hoop and trim away the excess wash-away stabilizer — the less you leave, the easier rinsing will be. Then rinse in hot water until the suds are gone and the stabilizer has fully dissolved. |
|
|
|

|
Step 19 |
Press and Dry the Pieces Press the rinsed pieces between a towel and lay them flat to dry. Your dimensional flower elements are now finished and ready to be assembled in the next hooping. |
|
|
|

|
Step 20 |
Hoop Tear-Away for Assembly Begin the second hooping by hooping a piece of tear-away stabilizer. Load design AFC3DFlower2 — this is the design that joins your pieces into one finished flower. |
|
|
|

|
Step 21 |
Run the Center Placement Stitch Run the first machine step, a placement stitch that marks the exact center where your flower will sit. |
|
|
|

|
Step 22 |
Find the Center X The placement stitch forms a small X at the middle of the design. This X is your target for centering the large flower in the next step. |
|
Step 23 |
Center and Secure the Large Flower Push a straight pin down through the center of the large flower, then through the center of the X. With it aligned, tape the flower to the stabilizer and remove the pin. |
|
|
|

|
Step 24 |
Tack the Flower in Place Run the next machine step — a tacking stitch in the center that anchors the large flower to the stabilizer. |
|
|
|

|
Step 25 |
Add the Secondary Petals Repeat the centering and tacking process to add the secondary petal set on top of the first. There is no separate placement stitch this time — use the tacking stitch of the first petals as your guide. |
|
|
|

|
Step 26 |
Layer the Petals With both petal sets tacked down, the layers begin to lift and overlap, giving the flower its dimensional shape. |
|
|
|

|
Step 27 |
Stitch the Center Fill Run the final machine step — the fill stitch that completes the flower’s center. Your design should now look something like this. |
|
|
|

|
Step 28 |
Your 3D Flower Is Finished Gently tear the design away from the stabilizer to release it. Your three-dimensional flower is complete — soft, layered, and ready to show off. |
|
|
|

|
💡 PRO TIP When you add the second petal set there is no placement stitch to guide you — let the tacking stitches from the first petals show you where to lay it. And when trimming wash-away stabilizer, cut close but not too close: leaving a small margin protects your stitches while still making the rinse quick and easy. |
|
Your Three-Dimensional Flower Is Complete! Stitch a whole bouquet — vary the colors and layer them to make each bloom your own. |
Three-Dimensional Flower | Anita's Tutorials | Anita Goodesign