
|
ANITA GOODESIGN | Anita's Tutorials Fringe Embroidery Add a soft, velvety texture — one slice at a time |
|
SKILL LEVEL Beginner Friendly |
HOOPINGS Single Hooping |
TECHNIQUE Fringe |
|
Fringe embroidery adds a soft, tactile element to your stitching that you simply can’t get any other way. Specially digitized satin stitches are worked side by side and locked in place by a tiny anchoring satin stitch along their base. Once the design is stitched, a single careful slice down the center of those wide satin stitches releases the threads into a plush, velvety fringe. It’s as easy as 1–2–3 — the only special tool you’ll want close by is a trusty seam ripper. |
|
MATERIALS LIST |
|
◆ Tear Away Stabilizer |
|
◆ Base fabric |
|
◆ Embroidery threads |
|
◆ Curved-tip embroidery scissors |
|
◆ Seam ripper |
|
◆ Ruler |
|
◆ Rotary cutter and mat |
|
◆ Embroidery hoop |
|
◆ 75/11 embroidery needle |
|
Step 1 |
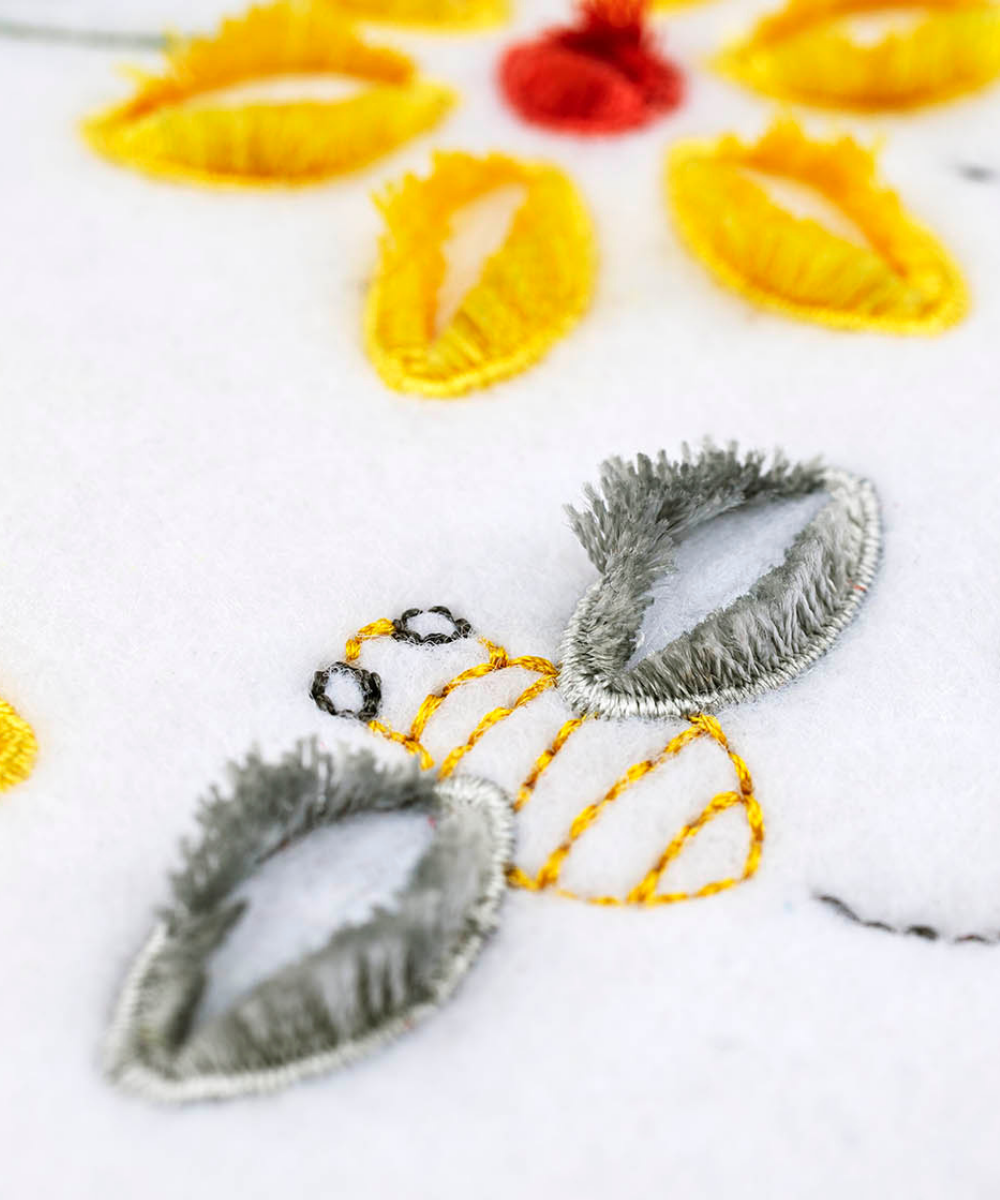
See the Fringe Effect Up Close Here’s the soft, velvety texture you’re about to create. Those raised, fuzzy threads are simply standard satin stitches that have been sliced open and brushed up — take a good look so you’ll recognize the fringe areas once your own design is stitched. |
|
|
|

|
Step 2 |
Hoop Your Stabilizer & Fabric To begin, hoop a piece of Tear Away stabilizer together with the base fabric of your choice, keeping both layers smooth and drum-tight. For this example we’re stitching on white felt, which shows off the fringe beautifully. |
|
|
|

|
Step 3 |
Stitch Out Your Design Run the design just as you would any standard embroidery, following along with your machine’s numbered steps and changing thread colors whenever you’re prompted. Let each step finish stitching completely before moving on to the next. |
|
|
|

|
Step 4 |
Slice Open the Fringe Areas Once the design has finished running, look for the areas that were specially digitized to be fringed. Take your seam ripper and gently slide it down the center of those wide satin stitches to open them up, taking care not to cut into the base fabric underneath. |
|
|
|

|
Step 5 |
Work Slowly and Look Twice Take your time with every cut. Keep a light hand and always “look twice before you slice” so the blade catches only the fringe stitches and never the fabric below. A slow, careful pass gives you the cleanest, most even fringe. |
|
|
|

|
Step 6 |
Reveal the Finished Fringe Once every digitized section has been sliced open, your design should look something like this — the flat satin stitches are now released into soft, raised fringe. |
|
|
|

|
Step 7 |
Admire the Velvety Texture Up close you can see how the cut threads stand up to form that plush, velvety pile. Gently brush or fluff the fringe with your fingers to even it out and bring the full texture to life. |
|
|
|

|
Step 8 |
Trim Away the Excess Remove the finished design from the hoop. Using a ruler and a rotary cutter, carefully trim away any excess stabilizer and fabric from around the edges of the design. |
|
|
|

|
Step 9 |
Your Fringe Embroidery Is Complete That’s it — your fringe embroidery is finished! You now have a soft, dimensional design ready to show off on its own or stitch onto your next project. |
|
|
|

|
💡 PRO TIP Fringe lives or dies by that final slice, so keep a light hand and always look twice before you slice. Cutting only the satin stitches — never the base fabric — keeps your fringe soft and your design intact. A seam ripper gives you far more control than scissors for this step. |
|
Your Fringe Embroidery Is Complete! Once you try fringe, you’ll want to add it to everything. Slice, fluff, and make it your own. |
Fringe Embroidery | Anita’s Tutorials | Anita Goodesign